

The JuiceBox
m360: 360 Ah LiFePo4
m240: 240 AH LiFePo4
A comprehensive battery system built for vans that will meet the needs of 99% of van builds.
Looking for a battery box over your wheel well? Check out the RadDad System.
Same components, different shape.
Shippable ✓ DIY Friendly ✓ Removable✓ Plug and Play✓

Optimize your mobile living experience with the
Ultimate Plug-and-Play Lithium Battery System!
Grab a Juicebox to cover all your power needs!
This is a drop in battery system for your van, RV, camper or tiny house.
With 360 Ah of lithium power you can run your induction cooktop, your 12V AC, your fridge and computers.
Designed to be user friendly and easy to install, the Juicebox is a complete package without the need for electrical knowledge or carpentry.
Using some basic tools, you can anchor to your floor and plug in to your rig’s appliances.

How does this fit into my van design?
It’s a seat.
Add a Lagun Table
Add a cushion
It’s a coffee table
It’s a stand for your Dometic Fridge to sit level with your galley.

Grab a Juicebox to cover all your power needs!
This is a drop in battery system for your van, RV, camper or tiny house.
With 360 Ah of lithium power you can run your induction cooktop, your 12V AC, your fridge and computers.
Designed to be user friendly and easy to install, the Juicebox is a complete package without the need for electrical knowledge or carpentry.
Available in 240Ah and 360Ah sizes.


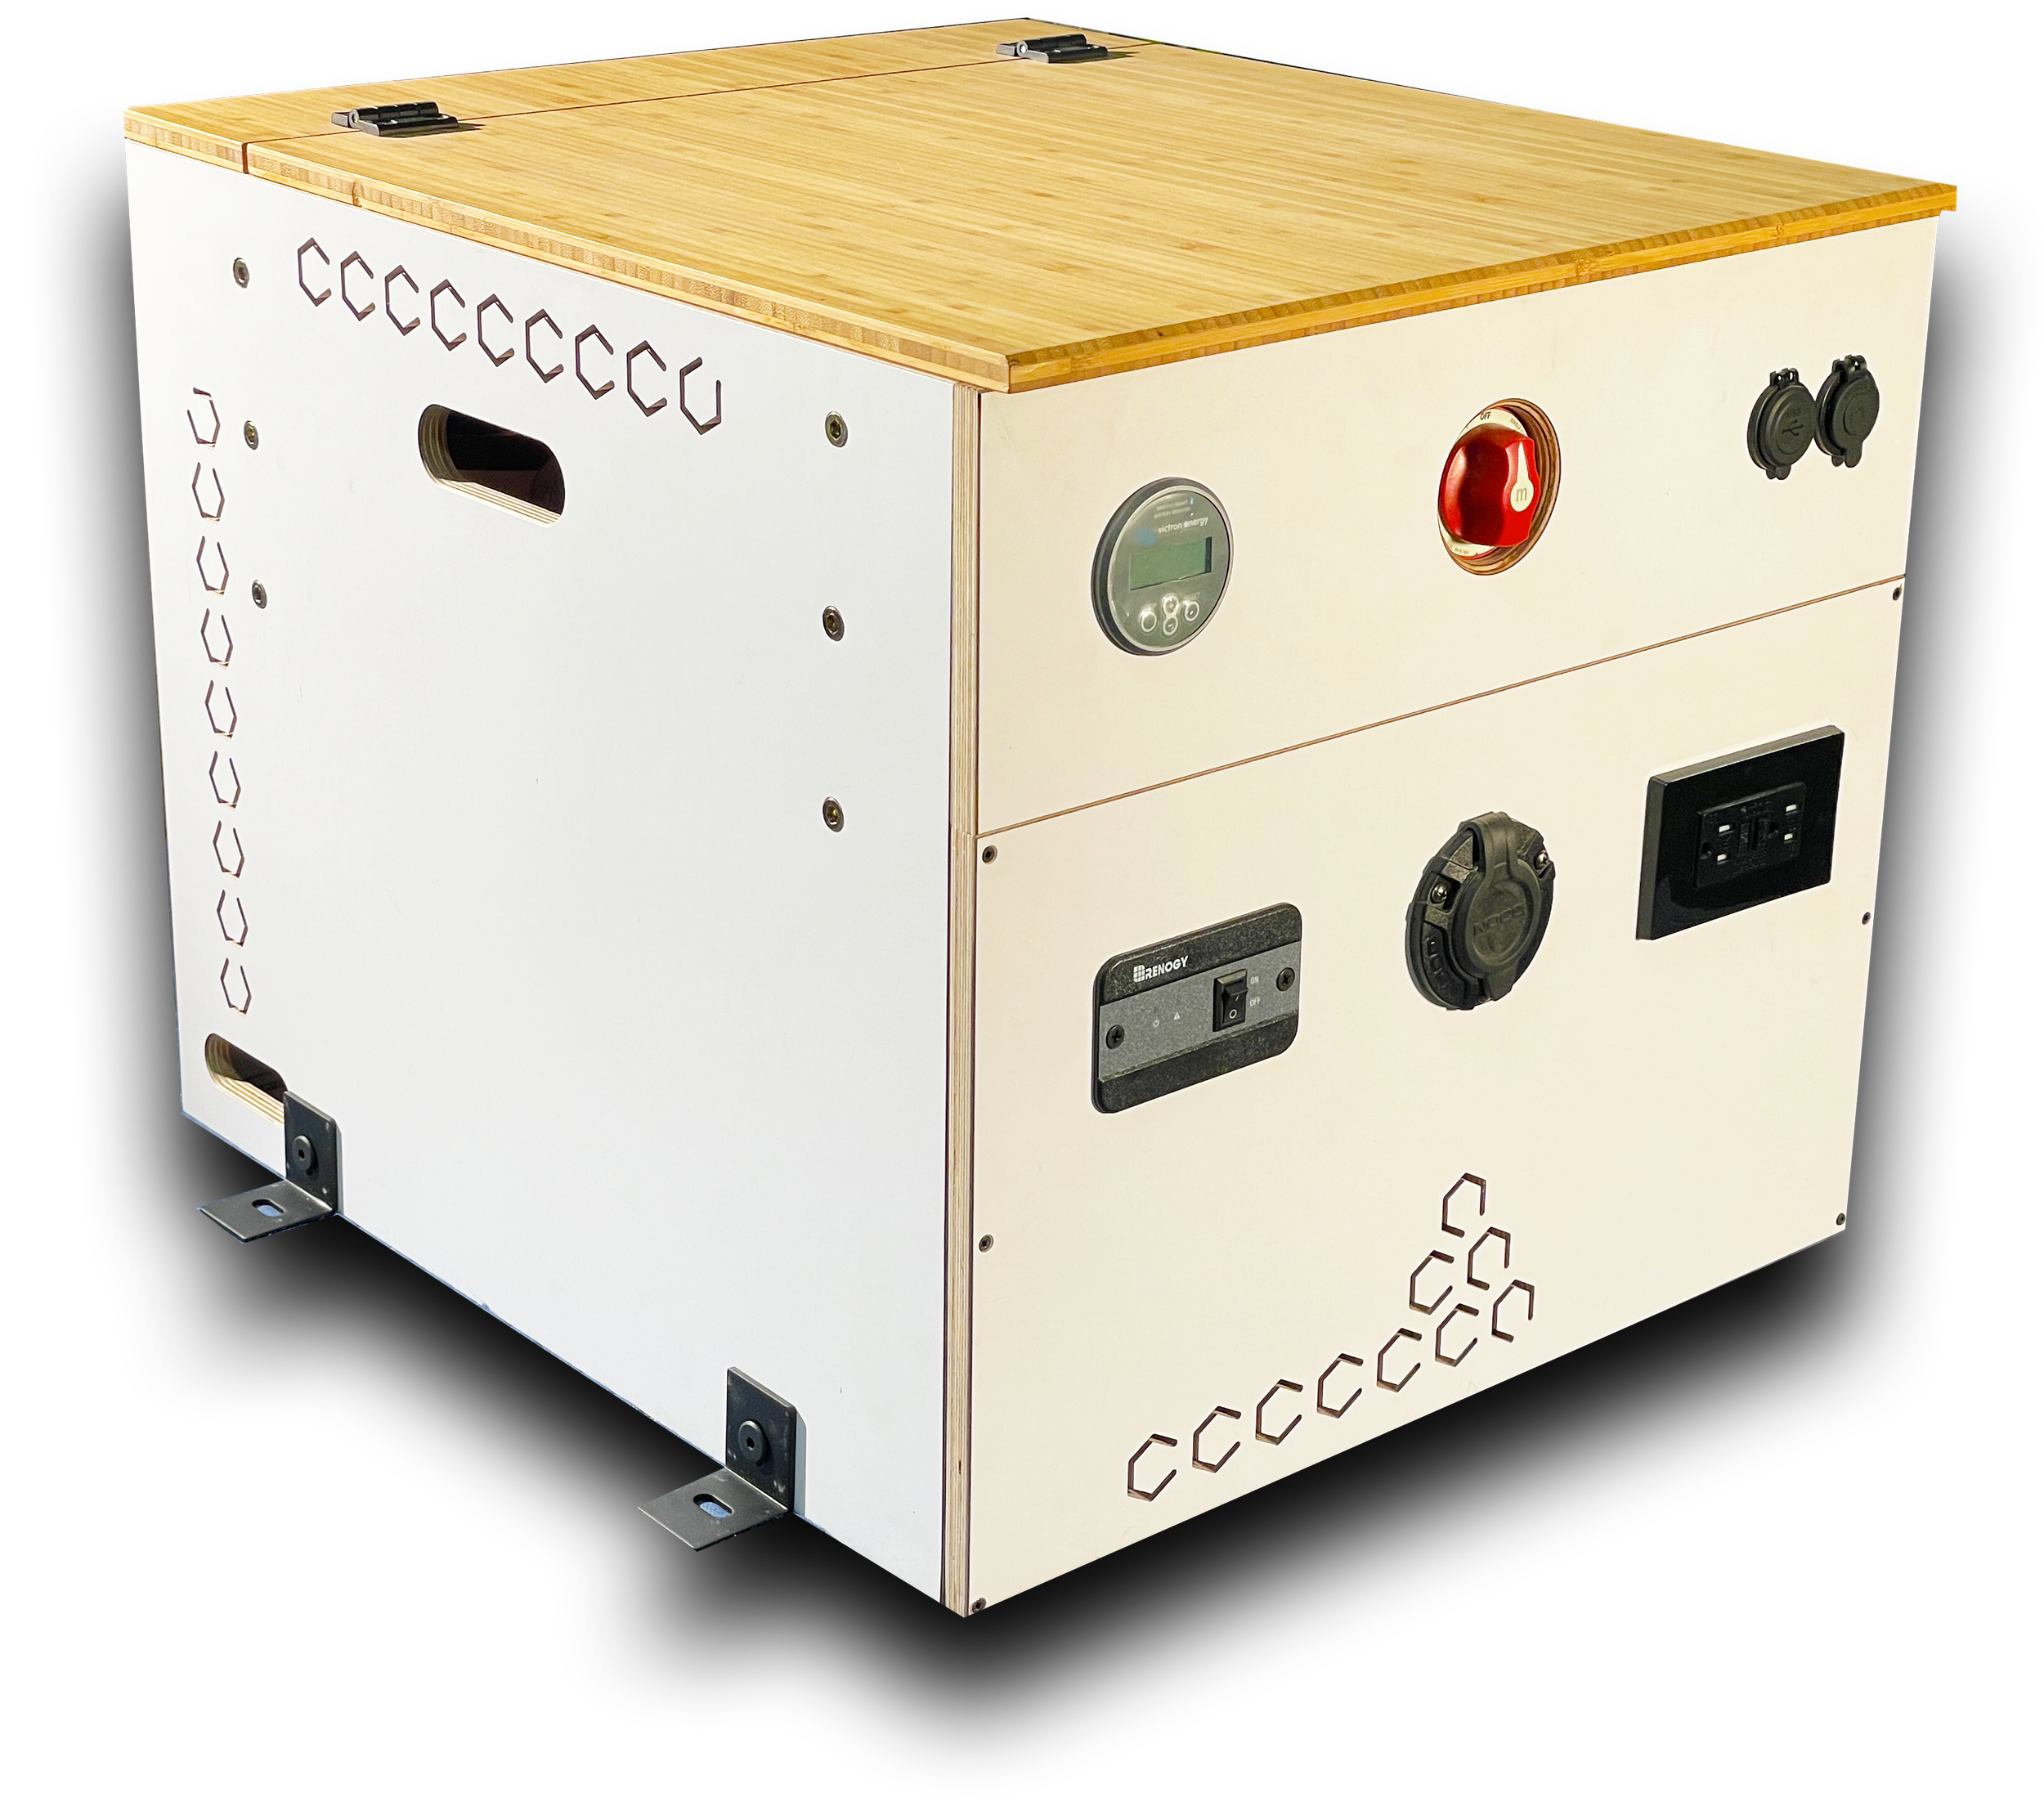
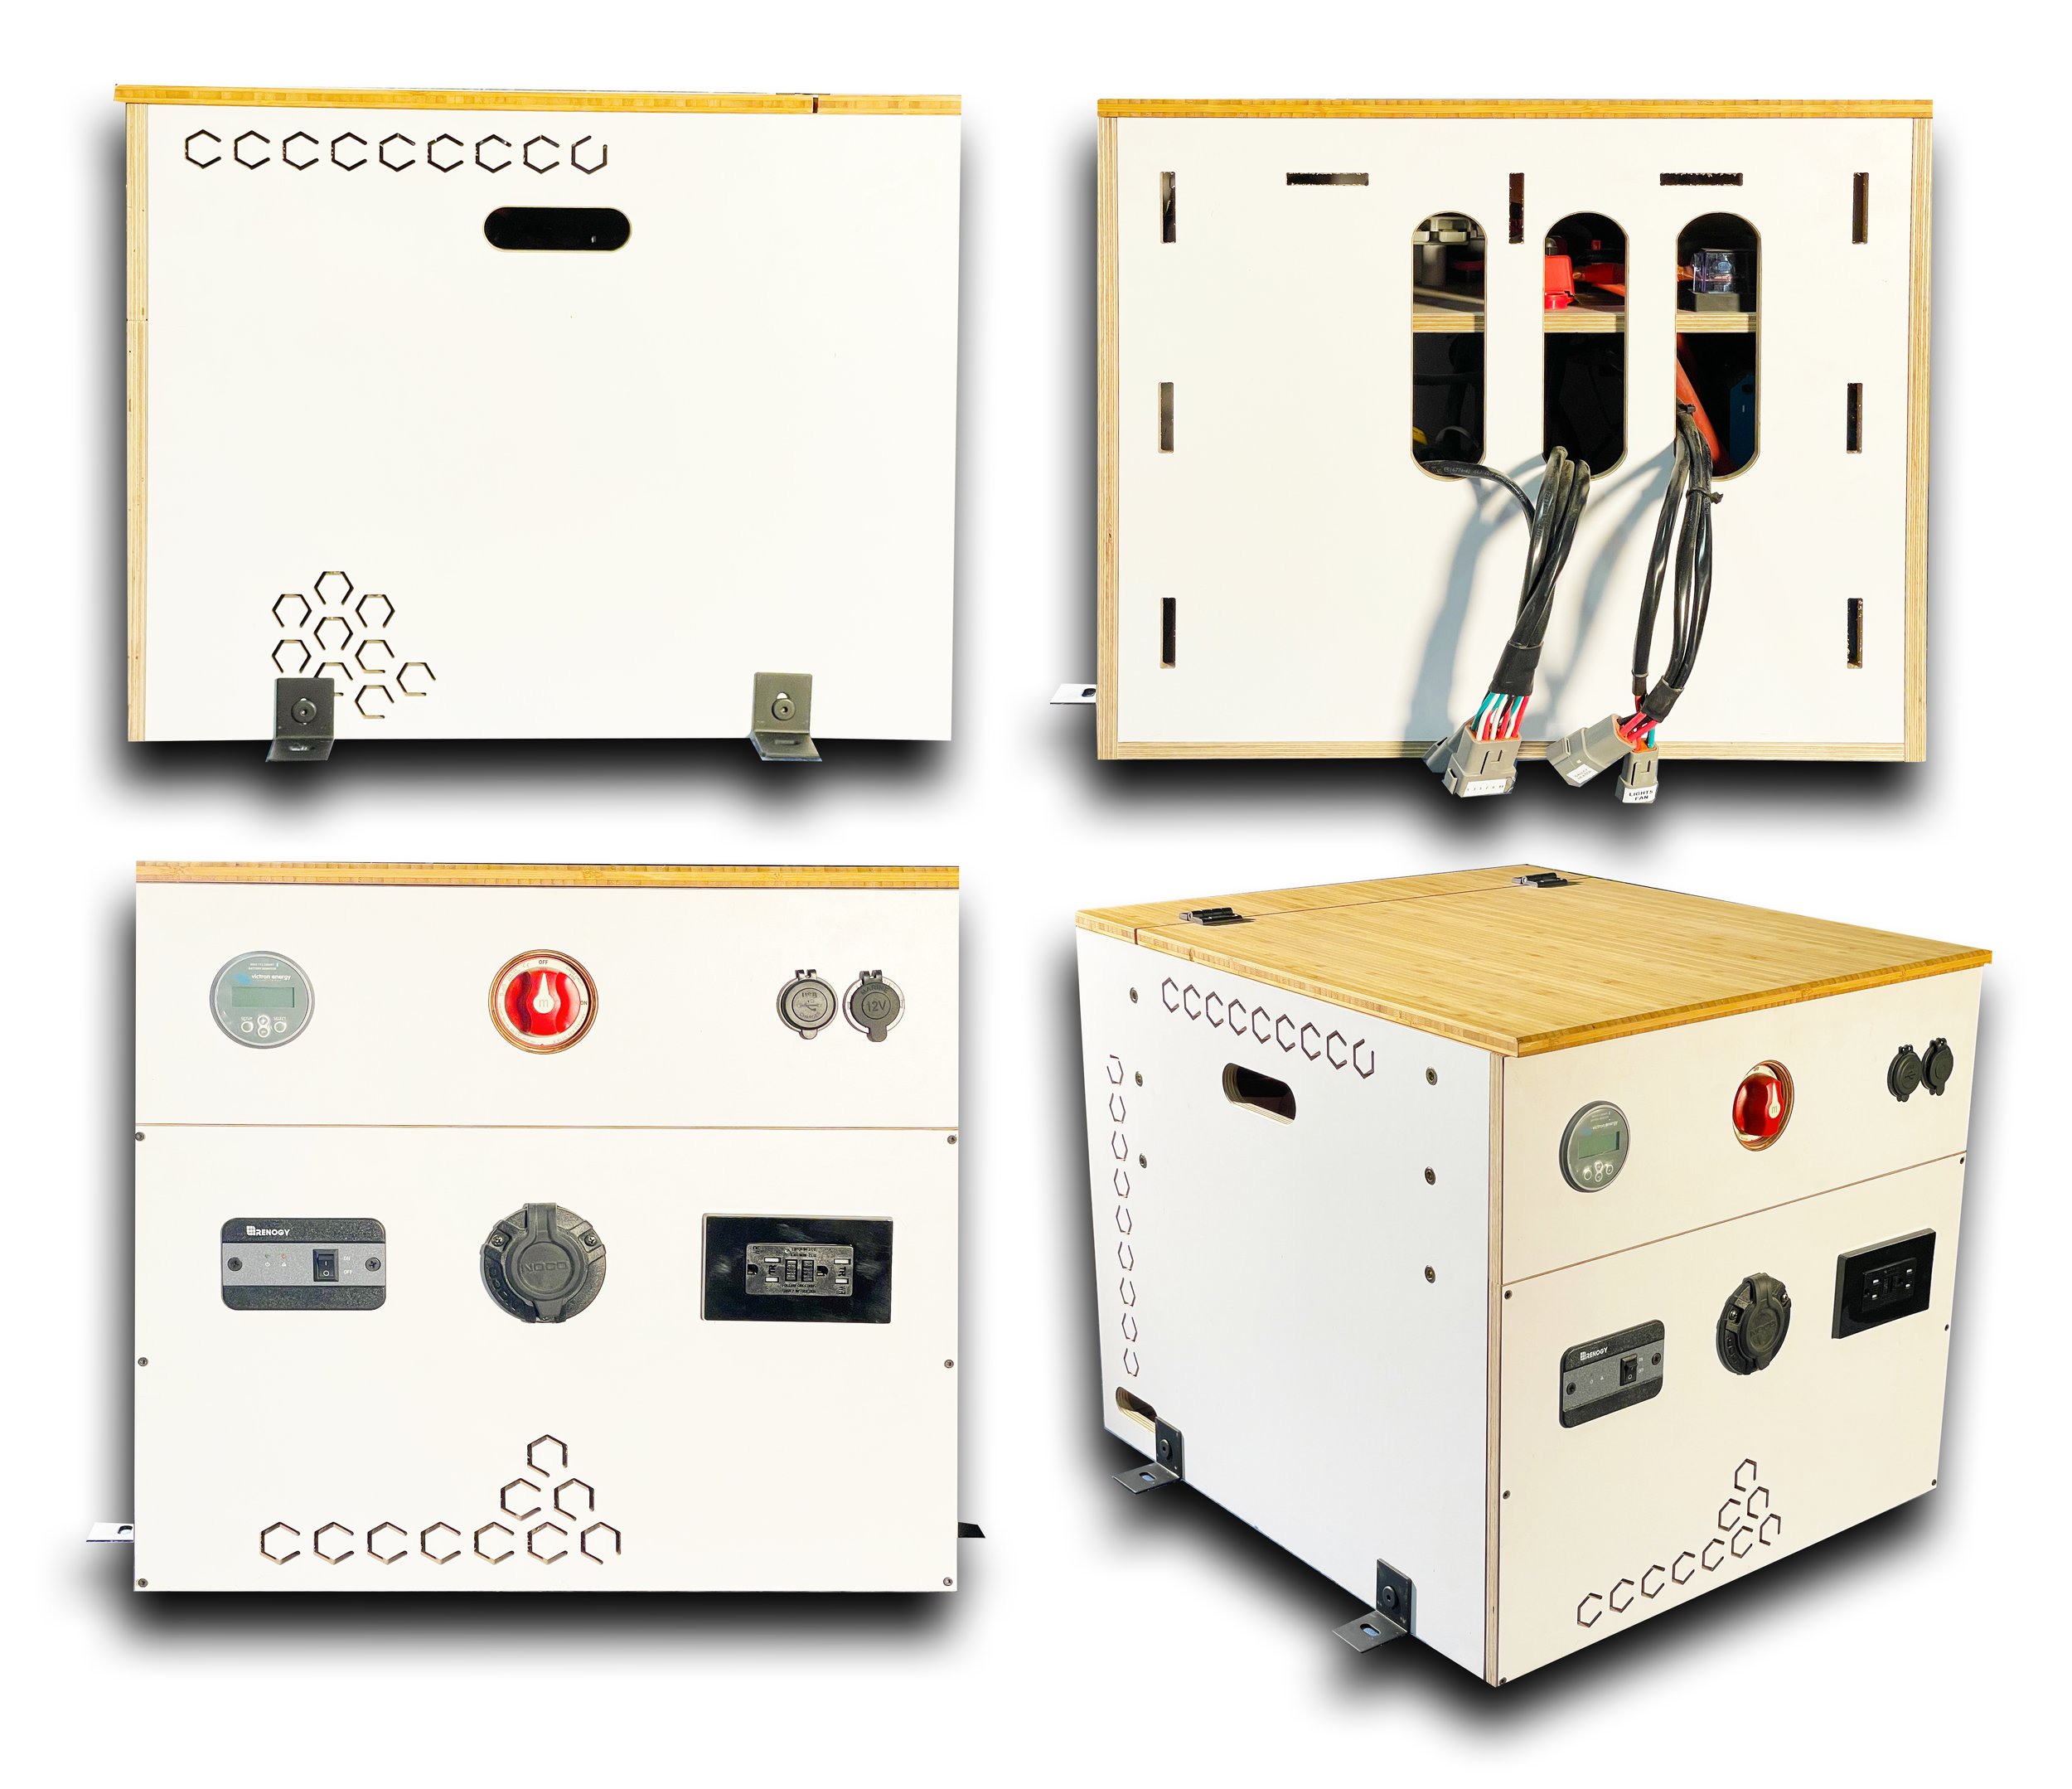
Dimensions
20w x 22d x 18h
(Inches)

Wiring
Connectors let you plug and unplug your Juicebox quickly, making your build phases and testing more dynamic.
Use the supplied Connector Harness to attach your lights and appliances. Butt splice , wire nut, wago — all are compatible.
Run the Alternator cable then plug in. See the install instructions below to attach a frame ground.
Anchoring
Easy anchoring with threaded inserts and brackets.

Plug and Play Wiring Harness
Easy to Install Brackets and floor insert anchors
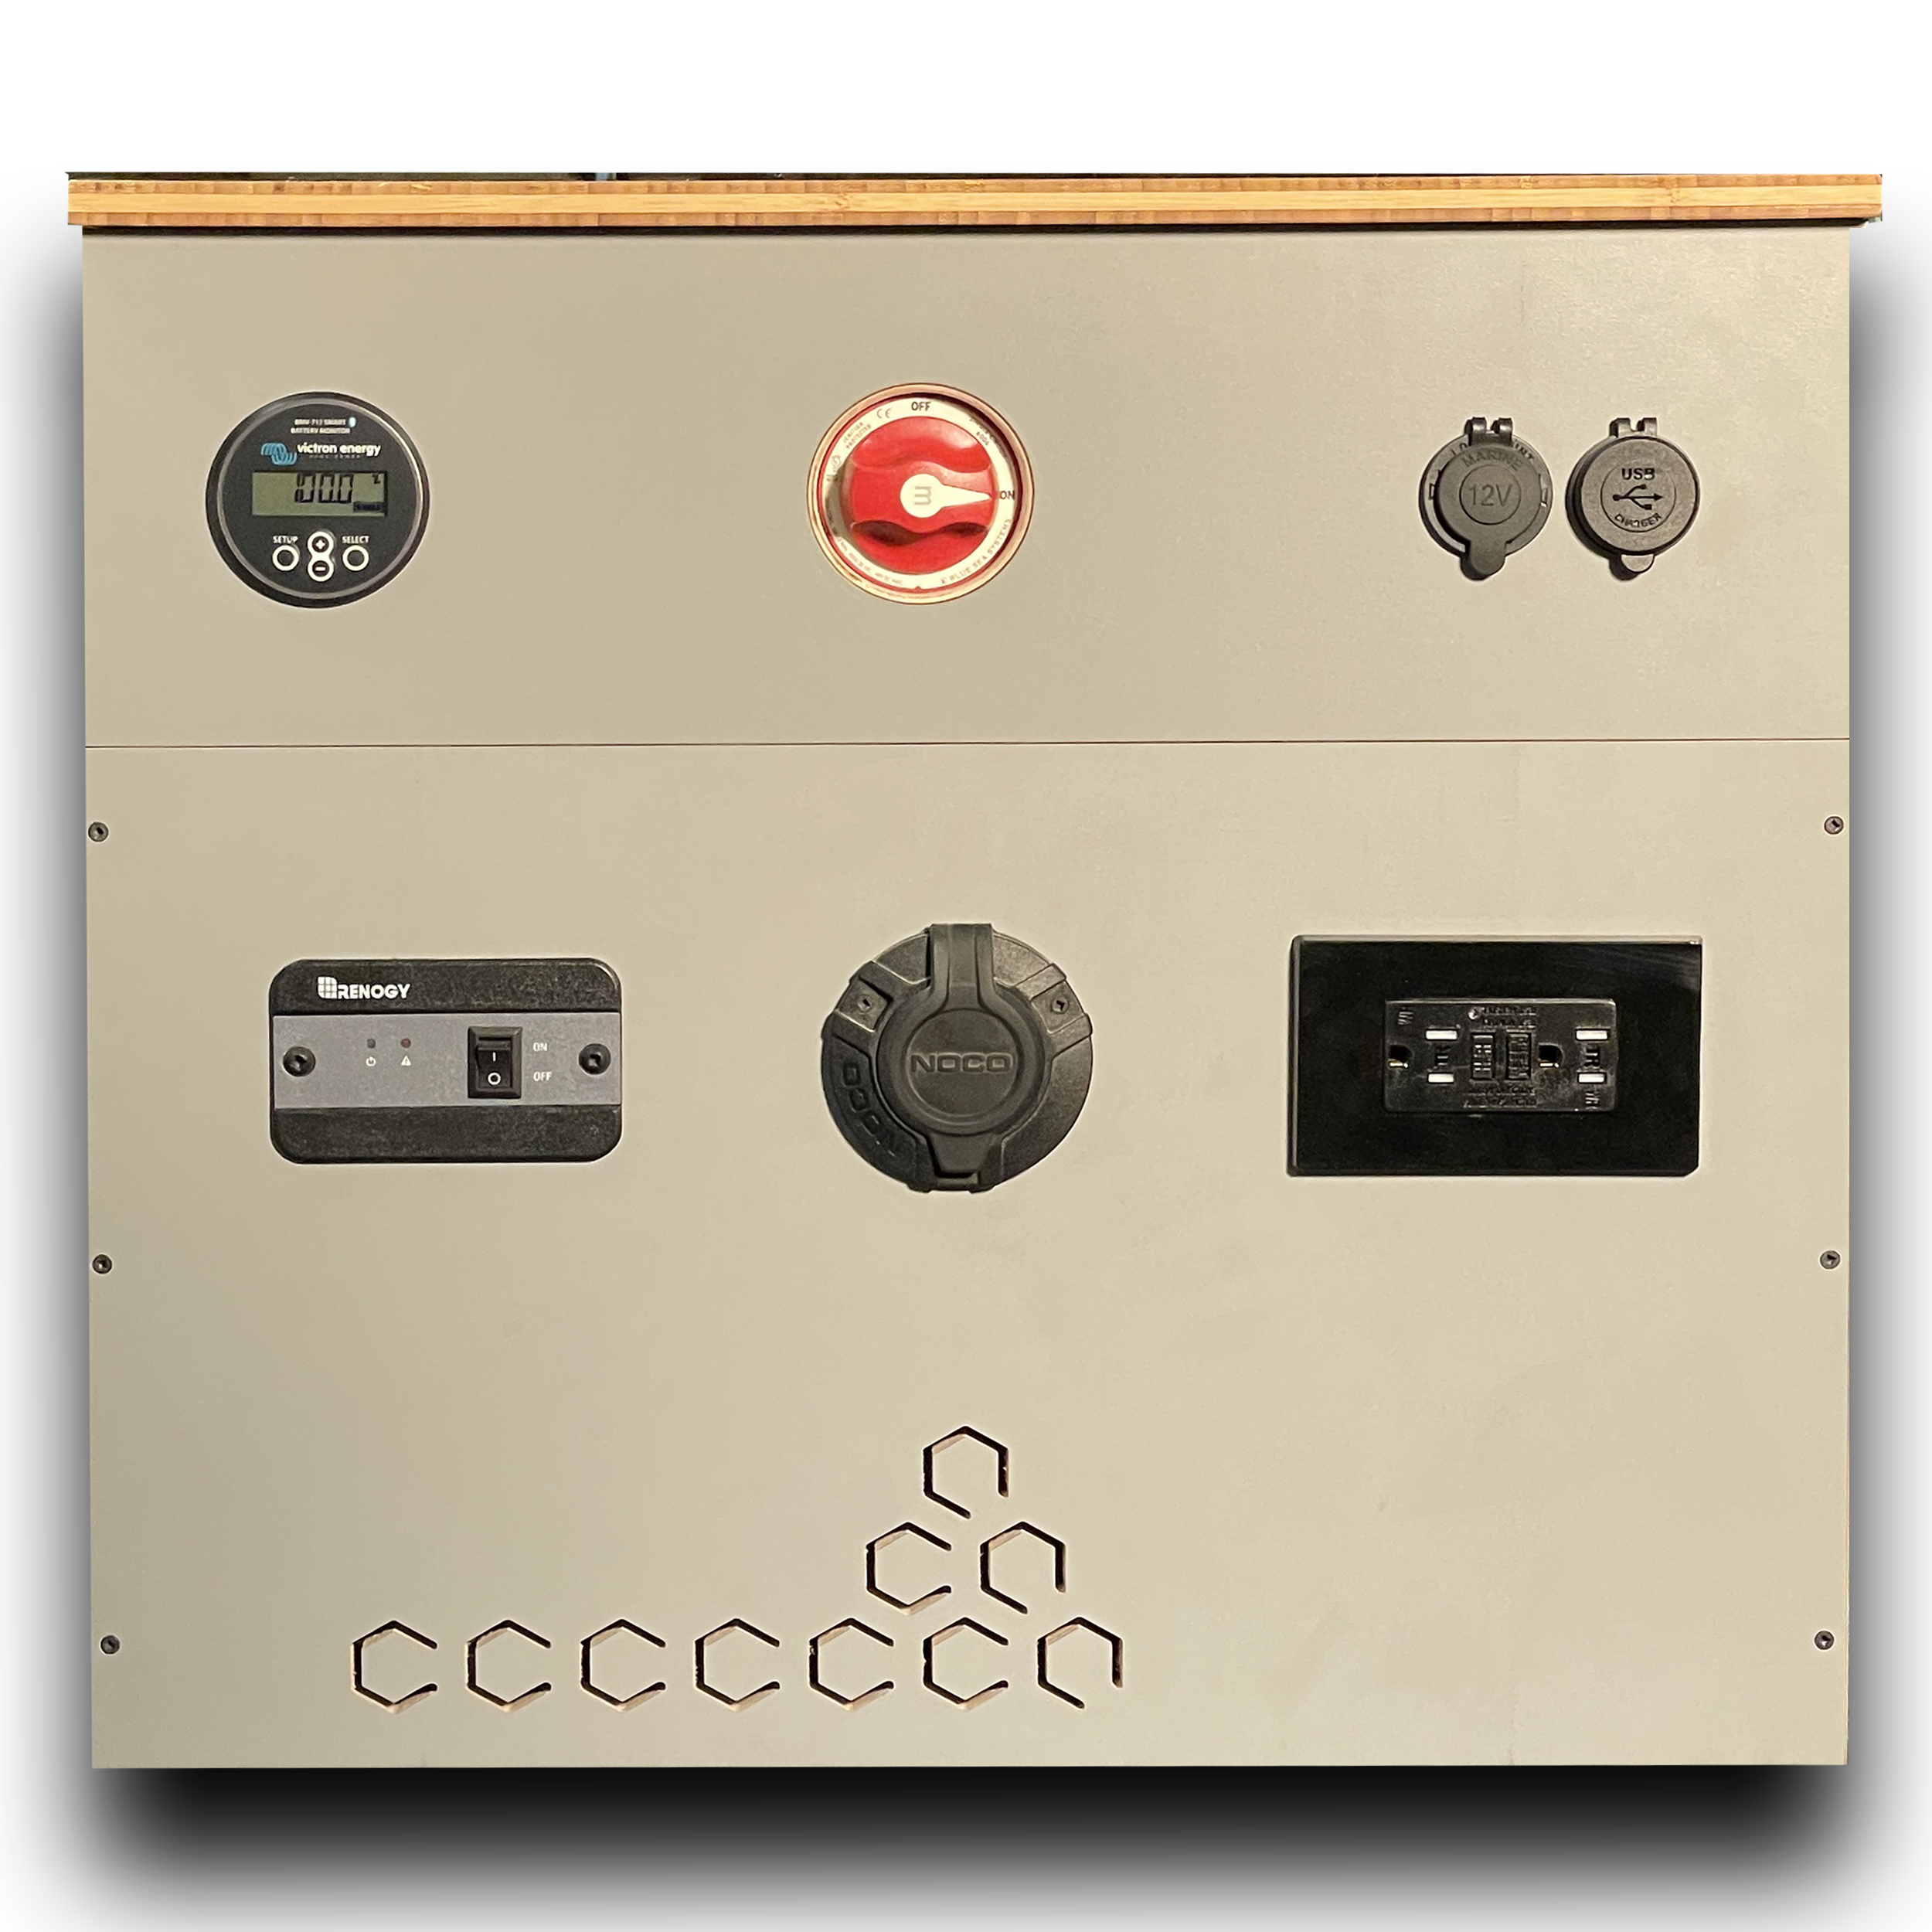
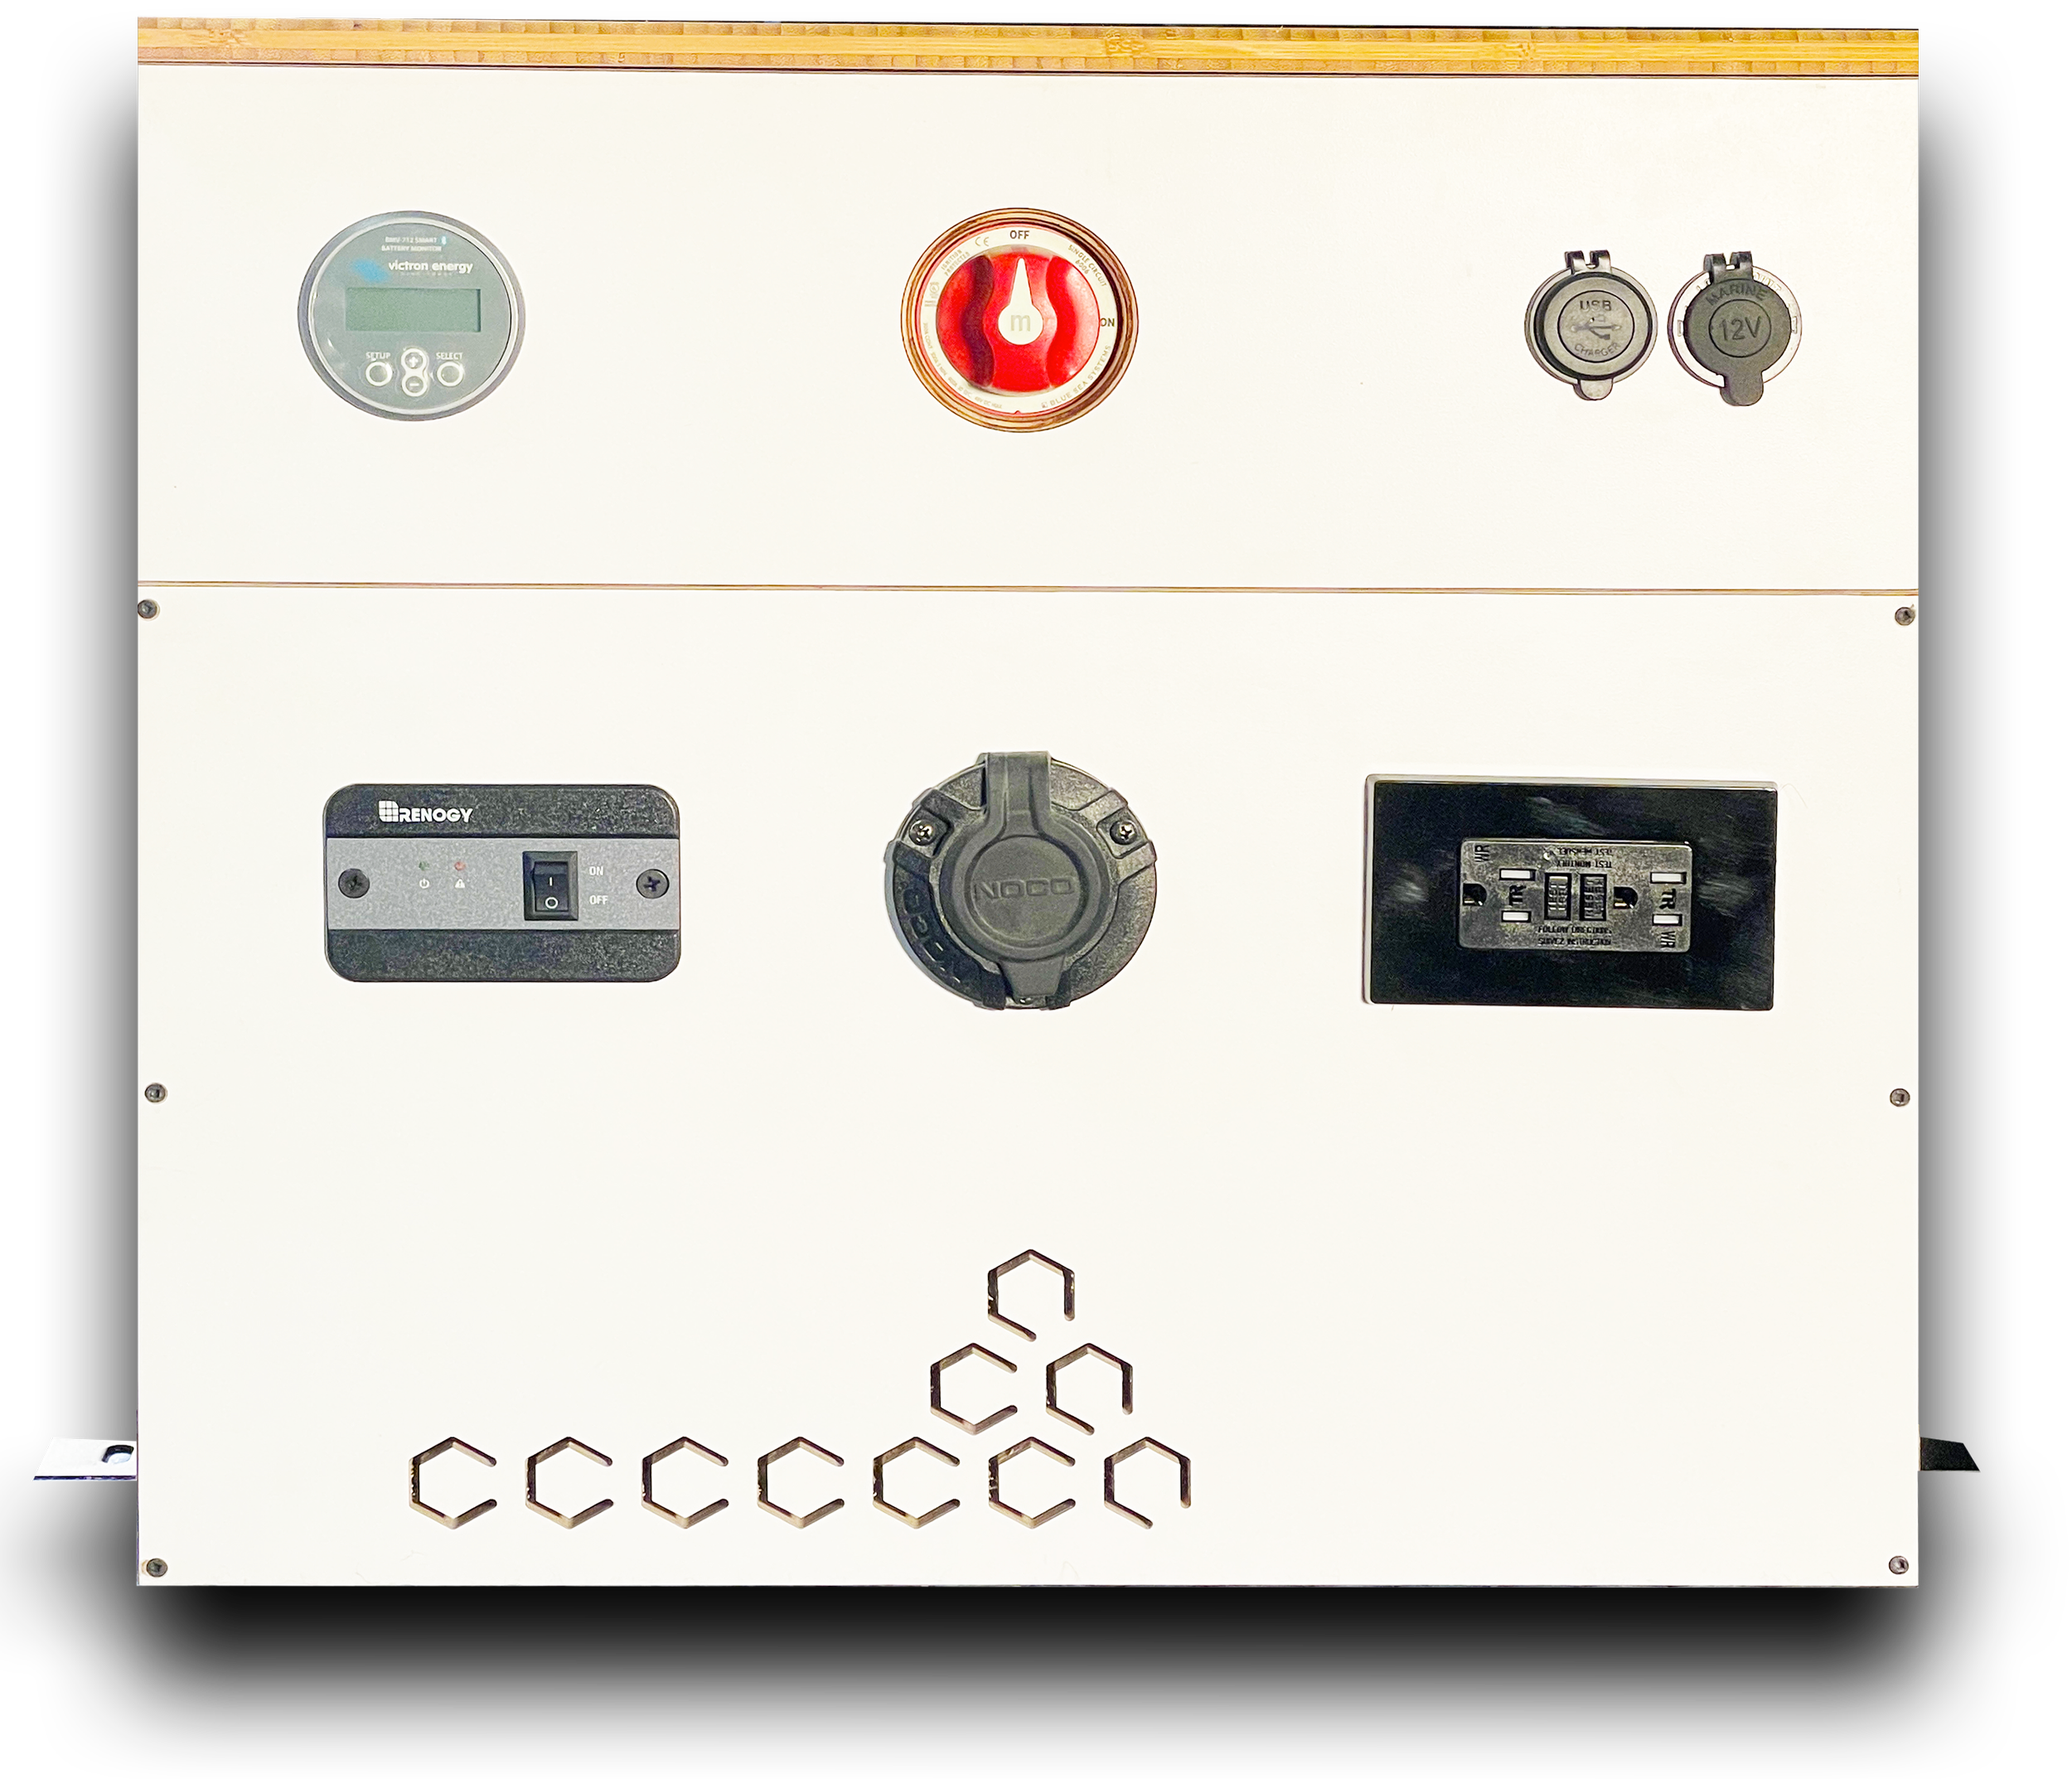
Victron Shunt with Bluetooth Monitor
Appliance capacity
Lithium - 360 Ah with 12yr Warranty
120V AC - 3000W
10 open circuits - 40A
250A Max Discharge
Charging
Solar - 30A
Shore Power - 45A
Alternator - 50A

I have a Goal Zero Yeti.
is it the same?
The Yeti, the Jackery, the Bluetti… all are great tools for their purpose. They are adaptable and can be used effectively for vanning, but they are still a square peg in a round hole. To use these, you need additional alternator charging modules. You need to build fuse blocks. And you need to house them so that their plugs are accessible.
But do you really want to have your solar wires and 120V circuit wires exposed permanently? We don’t.
Do you want to unplug your solar panels for your shore power to work? Not ideally.
Does your Yeti output enough 12V power to run a Dometic RTX air conditioner? Unfortunately no.
We are constantly problem solving low power issues from Jackeries, Yetis and Bluettis because, beyond your most basic needs, they are not designed to manage the power you use in a van.
The Juicebox is specifically designed for Vanlife.
It charges faster.
It’s compatible with any standard solar panel on the market, and comes ready for MC4 waterproof connectors.
It will handle larger loads for your biggest appliances
If you just want to power some lights and a water pump, and like the idea using your Yeti on the go for more than your van, then save the extra cost and stick with that.
But if you want a modular, plug and play solution to integrate into your build, then the Juicebox is the most complete product on the market.
Is this a Victron System?
No…
We love Victron, but for most vans it’s overbuilt, expensive and takes more maintenance down the road. Our system is half the cost, fits in this tiny box, and it just works.
We have kept the Victon Battery Monitor (BMV-712) because, well, it’s the best.
Components and Specs

Modular means that the Juicebox is removable and stackable, so it could be designed into your van in multiple ways.
Build it in as a seat. There are anchors on it to add a Lagun Table.
Build it in as a stand for your fridge, so your fridge is elevated next to your galley
Add the 360+ module to double the size of your system **Coming soon. Stacks on the bottom or side.
Modular Wiring means easier building.
Plug in up to 10 appliance circuits using the pigtail we provide. Use a standard crimp to connect with your prewiring, and go ahead and test your circuits.
When you build your walls, or want to dig back into the walls and change something, unplug the 1Up, remove the thumb screws, and move it aside
Modular adds value security — for the things we hope never happen
Renters insurance covers personal property in your van, but not bolted down parts, considered “part of the van.” Now your battery system is a product that sits there as personal propery.
If your van is totaled, it’s easy to pull out and move into the next one
If your van is old and “not worth investing in”, you can still get the system you need and then quickly transfer it to your next rig when you’re ready
If your van is impounded for a length of time, you have rights to your personal property.
So what’s so great about modular?
Wiring
Deutch connectors let you plug and unplug your Juicebox quickly, making your build phases and testing more dynamic.
To set up your quick connects, we supply a Connector Harness that you can attach your appliance wiring to.
Crimp, wire nut, wago — are all compatible. We prefer heat-shrink butt splices (You’ll need a standard wire crimper that can handle 14 AWG).
For the 1/0 Alternator run, attach the ring connector to your battery positive terminal. Run the cable to your Juicebox location. The other end will then fit into the Anderson Plug connector. 30 ft is supplied.
The Black 1/0 will get a local frame ground by the box, and we only supply 4 feet. Find an existing hole in the wall cavity (or create one), and remove the paint around it (diameter ~1 inch) using a wire brush wheel or grinder. This step is important to ensure a good ground connection, and make sure to use the lock washer provided with the bolt in your kit.
Install Guide
Anchoring
You’ll need a drill.
Installing into a wood or composite floor with 3/4 thickness:
Prewire
Place your Juicebox where it will live and plug in.
Place brackets against the threaded inserts on the side of the box and mark hole locations
Move Brackets and drill 3/8 holes into your floor
Using a _________ Allen key, screw the provided anchor nuts into the floor
Attach the brackets to the Juicebox using the black bolts and a _________ Allen key. Leave loose.
Tighten to the floor with thumb screws.
Finish tightening black bolts.
Voila!